
There are so many transparencies on the market at the moment that it can be a little overwhelming deciding on which one and how to use them, so I have created a little tutorial to make using these items easier.
Full-page transparencies
Some transparencies are designed to cover your whole page, which can seem daunting but in actual fact can lessen the amount of detail you physically need to add to your layout. For the layout below I chose patterned papers that matched the transparency, to figure out placement of my layout I put the transparency down first and added my patterned paper on top, this way I could tell if any of the elements were going to clash or cover each other up. When I was sure of placement I reversed the process putting down my patterned paper first and building up so that my transparency was adhered last. If you take the elements of the transparency away you can see that I have done very little to the actual layout… the transparency has done all of the work
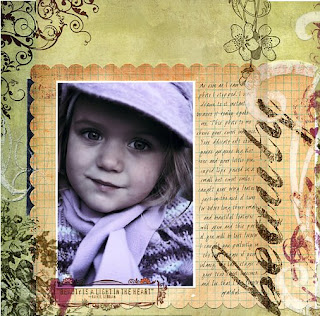
Another point I would like to make regarding using a full page transparency is DON’T be afraid to cut it up!!! Using your transparencies just like your patterned paper gives you the ability to really layer your layout up and create more depth to the layout. In this layout i have used sections of two different transparencies
Frames
Frames can be a lot of fun, they can give a completely different look to your layout without all of the mess. Frame transparencies can be used over a feature photo to help it to stand out on your layout. They can also be used to house your journaling or a cluster of embellishments... the possibilities are endless.
 glitter cut transparencies
these transparencies are so simple to use and are very effective, these are used just as any embellishment is, they are great for adding texture and a burst of colour but also have the added bonus of having transparent features so can still be used over the top of photos if required.
 Creating your own transparencies
The wonderful thing about digital scrapbooking that it gives us the opportunity to create more personalised layouts using digital elements. So many people think that because they do not have a 12x12 printer they cant incorporate these elements into their scrapbooking... think again. By using a blank transparency you can add brushes, frames and journaling to your layouts which gives you more creative licence over your layout!!!.
You can also stamp images or words using stazon to create your own transparencies. Stazon comes in many different colours so co ordinating your stamping with your layout is easy.
Mini Albums with transparencies
of course you would have seen these EVERYWHERE i think they are so effective, and what is more they are not hard to do. You can add transparencies into existing mini albums or create your mini album from scratch so that you can build up that layered effect. Ali Edwards has some great examples on her blog and makes creating them seem so super easy lol
Extra tips
*When adhering place adhesive dots or tape under dark sections of your transparency or better still add embellishments over the top of the adhesive mark to cover it and add extra dimension to your layout
*You can also use stitching, staples or brads to adhere the transparency to your layout
*Add your own twist to transparencies by painting sections of open space on your transparency. This will add visual appeal to your layout while giving you a one of a kind look to your layout
*You can also use blank transparencies and alcohol inks to create your own unique look shown by Anthea here
*If creating your own transparency be sure to use what your printer recommends... using alternatives can be a costly exercise!!!!
Well folks that is it... i hope i have those creative cogs turning!!! i will be checking the gallery in the hopes of seeing some transparency inspired layouts over the coming weeks :o)
xxJode
PS one of our talented designers is having a birthday on the 3rd of November. So be sure to visit Anthea's blog and wish her a happy birthday!!!!! I hope you have a wonderful birthday Anthea and hope that you are spoilt rotten
3 comments:
great LOs Jode!! love your entry this week!!! um thanks for the mention! LOL
you make it look so easy, your layouts are so classy, well done
Totally gorgeous LO's & tips there Jodi!!
Thank you
Kylie :)
Post a Comment