
 and it was FANTASTIC, and whats more is I now have more photos to scrap =)
OK today I wanted to show you a little on masks. When Heidi Swapp came out to the country late last year she came with this awesome technique that she shared with a lot of keen Scrapbookers. For the staff that were at the Scraploot shop during the Grand Opening by Heidi herself we were also shown this technique. Heidi put a gorgeous page together right before our eyes and it was easy to become inspired by her enthusiastic nature. I took this technique home with me and have been putting it to some good use and then added my own little twist to it.
For this you need some inks.

Tim Holtz is great for larger projects, and I recommend using the Blending Tool with these inks, you can blend in just the one colour or multi colours. in one of my pages for this months Design Team I used 3 colours on the one page and the blending tool just worked brilliantly. (Head to the Scraploot Gallery to check it out)

Versa Mark inks are also great to use too. They are smaller then Tim Holtz inks and more easily manipulated to move around (you will see what I mean soon) and when they are brand new their colours are nice and vibrant.
 Your also going to need something to act as your mask. Heidi Swapp has released some new Mega Masks and Scraploot also stocks the older designs that are fabulous.
I also have here some negatives from some Die Cut Sheets and a piece of wiring that I had lying around in my stash.
To get started I will show you the Die Cut Negative first.
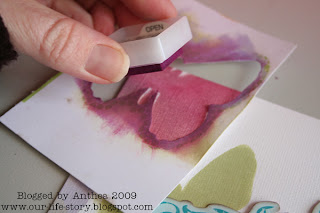
Place tiny pieces of double sided tape on the corners underneath the diecut. touch them a couple of times to take away the stickiness, just so that they are slightly tacky enough to hold the diecut in place. Place it on your layout and then gently starting from the outside of the diecut lightly rub your ink pad over the diecut, starting from the outside will allow you to bland the tones into the centre.
Once you have a result your happy with lightly lift the die cut up. On this layout I have used 3 different coloured inks, and I love how it gives a bit of life to the page
This next technique I am using the wire
Like I mentioned before Versa Mark ink pads have a nice soft sponge, so it is easy to move the ink pad around. Here you will need to dab the ink into the spaces between the wire, do this as hard or as soft as you like, change your colours, work in straight lines or messy, add this to one spot on your page or a few. You should end up with something like this
And for this last one I am using a Heidi Swapp Mask
Here I have used the Versa Mark ink pads again by dabbing them into the spaces and doing this till I have a desired colour, move your mask around and make it slightly messy, or for a more clean look just leave it in the one place. If you were using Heidi Swapps Mega Masks then Tim Holtz Distress Inks and a blending tool would work wonderfully.
 This is a fun little technique that is sure to brighten up your pages. If you use it be sure to share it with us in our gallery.
Stay tuned we will be placing our votes on the cyber crop winner and it will be announced later this week.
Anthea
3 comments:
great little techinque Anthea. I will have to give it a go.
thanks Anthea your layouts are beautiful as usual
heyy Anthea !!
you know what ?? i was there at the shop but... i forgot all about it ! ithink i was sooo drawn to watch Heidi talking :)
so... i will definitely re-try this next!!
oh by the way... those LOs are.. stunning !!! :)
Post a Comment