Saturday, February 21, 2009

tips and tricks

Hi all, for my blog update this week I'd like to share a few tips and tricks I've learnt over the last few years which have helped me simplify and save time when creating my layouts.
By now you probably know I love using brads and the quickest and easiest way to make holes for the brad is to use a push pin and push pad or soft craft mat. Just position the pad under your layout where you are going to make the hole and push the pin through the paper. EASY.


My second tip is attaching ribbon to your layout. Lay down your ribbon where you want on the layout, then remove it. Place a strip of double sided tape here along your page where your ribbon was, take off the backing and then re-lay your ribbon , this gives a very smooth finish, its important you put the double sided tape onto the page not the ribbon for a smooth result.


Do you ever have trouble sliding your layout into a page protector after you have finished ? To over come this, before you start your page take a 2 or 3 mm slice off one side of your background card stock, this will allow for easy insertion into the page protector.


This next tip will help you to make a smooth sanded edge on your photos or paper. Using a distressing tool such as this one from basic grey or this one from Kaiser and a craft mat, place your paper or photo right on the edge of the craft mat. Run the distressing tool down along the edge of the paper/photo. You must make sure that the paper /photo stays on the very edge of the mat for a smooth finish.


A quick way to attach buttons to your layout without the hassle of sewing them on is to use some embroidery thread. Simply thread it through the holes of the button, then tie a knot at the back.. and cut off the extra thread. Then attach the button to your layout with pop dots or a strong adhesive. Voila !


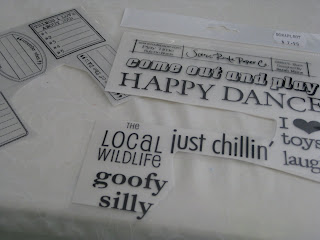
My final tip I learnt from Jennifer Ditz Mcguire a few years back when I attended a class with her. When it comes to using rub ons such as these from scenic route leave the packet closed and simply cut out the words or shapes you need through the plastic, this helps protect the unused portion of the rub ons.


I hope you can use some of these tips to help make your scrapbooking life a little bit easier.

Till next time
Kim


Tuesday, February 17, 2009

Shop Update...

Well thought it was about time for a bit of a shop update... lots of new products have started arriving and its so hard not wanting to take it all home with me LOL....

Just arrived today 17th Feb
Prima
Kaiser
Websters Pages

also arrived in the last few days are
3 Bugs
Bo Bunny

(these will be uploaded to the website in the next few days)
So the shop is looking gorgeous and we have also started up our in store classes which are going great... thanks to all the lovely ladies that have come to our classes so far... make sure to check out the website or come visit us in the shop to see March classes... We have 2 very talented teachers joining us in March.. Nicole Greguric and also Belinda Howlett...check out their stunning work that they are going to be teaching...

We also had our first crop night in the store... wow it was a huge night with 24 ladies scrapping the night away... lots of fun and laughs and maybe just a little scrapping LOL... here are some pics of the night....

thanks ladies for joining us on our first crop night... and if your wanting to come to the next ones make sure you book in early (so you dont have to sit at the naughty table LOL)...

Ok so a few people have been asking us when we are going to be starting our competitions back up so now i can tell you... Put it in your diary now .....

SCRAPLOOT's first CYBER CROP (to be held here on the blog)
March 6th (challenges will be loaded up here on the blog and your pages are to be put into our gallery)....

Keep checking back here for more updates and info soon in regards to this... we have some fun prizes for the weekend so make sure you come and join us...

Ok think thats about it for now... hope to see you all here for our first cyber crop...

till then have fun scrapping.
Sheree

Monday, February 16, 2009

update on pregnancy journal


I thought i would just update the blog with the latest pages from my pregnancy journal

The journal has taken on a different feel from what i initially decided on, it has now become a little more child friendly than what i had intended. Gone is My diary of thoughts feelings and ramblings and instead i have found myself catering to my children's curiosity with "the book about our baby". I have kept the pages pretty simple and they will all have the same repetitive theme throughout so that my children can focus on their interests in the pregnancy. As i have children of different ages i found that the best way that i could cater to all the age needs was to include a little bit for each of them.

I have included a little Facts spiel for my ever knowledgeable 11 year old daughter with developmental photos of the baby. A run down on how i have been going through the pregnancy for my sensitive and ever so worried 7 year old son and some pretty pictures of mummies expanding tummy and lots of butterflies thrown in for little miss four.

i have found that as i add pages my children pour over them, they cant wait for me to add more pages to their book about our baby.


For some extra fun i have added page numbers at the bottom right of every page set so that little miss four knows she is on the right page :0) and so that she can choose her favourite pages, no doubt it will be page four lol as that is her favourite number!!! Also there are some reoccurring favourite items ie. butterflies that happen to be on each page for her to hunt down and find.. some are very hidden.


*All facts have come from http://www.babycenter.com.au/, i have signed up for the weekly pregnancy newsletter. Every Monday my family know that we will receive another update on what is happening with our baby and because it is a weekly update my children especially feel like the baby is ever changing (as it is) and that the pregnancy is going so much faster (lucky them lol). It is very informative and an invaluable source of information for mothers to be!!!

* All photos of my fat tummy are taken by miss 11 year old budding photographer.

Wednesday, February 11, 2009

If you want to help,

Then please read on


Head on over to THIS post for the details.

Thankyou

Anthea

Monday, February 9, 2009

Adding TEXTURE to your pages

Hi Everyone
First of all I'd just like to say how deeply sorry & sad I am after watching the terrifying events unfold on the weekend in the Victorian bush fires!!...I think I spent most of the weekend crying in disbelief........my heart, thoughts & best wishes go out to all those unfortunate enough to have been affected by this terrible tragedy with the loss of lives, homes, family & friends!!


This week I'd like to share with you a few techniques & hints I use to add texture to my pages.This lo called my special place is full of texture!!
One of my favourite things at the moment (just like Sheree) is my Cuttlebug!!.....The embossing plates for this machine are an awesome,quick & easy way to add texture to any lo or project. They come in a great range of styles & Sue has some available in the Scraploot shop.
In keeping with my tree theme in the photo I have taken the Forest branches template and on various pieces of brown Bazzill I embossed this design. I then drew a template of the shape I wanted to resemble a tree and cut it out.
Lastly I lightly glazed some dewdrop Brilliance ink spot over the embossing to enhance it further & create even more texture.


Adding some paper tearing & distress ink to your page add instant depth & texture.

Also cutting out some flocked patterns such as this red flower from the WRMK white out nonsense collection below is another way of adding some quick & instant texture to your pages.


When adding texture you can't go past a good acrylic paint splash.

To get maximum effect without the mess...lol....I like to add a blob of paint ( if your paint is a little thick you may need to water it down a little with a few drops of water to get an even consistency) then lean down close to your page and simply blow in the direction you wish to add texture in. ......It's that easy!!

I have also torn straight across the middle of my patterned paper, then on an angle using a thin paint brush end I rolled my paper around in opposite directions to create a scrolled opening to add my title. Using distress ink on the edges of the scroll helps to add a rustic, vintage texture as you can see in the image below.

Again on the lo below I have used my Cuttlebug with two different patterns an layered the embossed patterns & added a cluster of texture with a metal embellishment, a stamped image with 3D foam tape & a knot tied in the middle of my ribbon.
Again I have swiped an ink spot over my embossed pattern to enhance the embossed image again adding to the texture of the page.

Below I have embossed the wing I have used from the new Fancy pants range "The daily grind" to create the texture of feathers to further enhance the wing.

Last of all I have used some corrugated card scraps I had lying around, scalloping one edge and a simple strip up the top of the photo's.

Your pizza boxes are also made of corrugated card. If you carefully rip the first layer off to reveal it, you can then paint it before applying to your lo. Or for a more rustic look leave it in it's natural state.

A simple piece of lace scrap applied over the top will help to lift the corrugated card & emphasize that texture even further.


Well there you have it......a few quick & easy ways to add different textures to your pages.

Looking forward to seeing some textured creations in our Scraploot gallery soon.

Take care & happy scrapping

Kylie x

Sunday, February 1, 2009

My favourite thing...

Hi everyone... well how time flies hey... its feb already one month gone in the new year...so hows your resolutions going if you made any... Me well i dont bother cause i know they will never last LOL...

So today is my turn to update the blog and today i tought i would share with you all my new favourite things to use in my scrapping and the diffrent things you can do with it....

So my all time Favourite thing at the moment is my Cuttlebug Machine... i think that this would have to be my best purchase and i have used it alot in my scrapping both with making cards and my pages....
One of the best things about the cuttlebug machine is that you can use lots of other diffrent dies i find that Spellbinders Nestabilities are such great value for money and come in many diffrent sizes and shapes...
(I store my spellbinders Nestabilities in CD cases with a little bit of double sided tape to hold the larger ones in place)

Using the Spellbinders Nestabilities you can cut many diffrent types of materials such as paper, thin chipboard and felt... here is a little tutorial on how to cut out felt using the cuttlebug and the spellbinders...

as you can see the dies have a raised bit in the middle this bit is the cutting edge so this is the actual size that you will cut out.

to cut out using the spellbinders dies you must use the following plates A plate on the bottom, C plate and one B plate. Place the die with the cutting edge facing up and lay your chosen material on top of the die. I am using a woolen felt.
Once you have your layers roll the plates through your machine to cut it out... sometimes with a thicker material you may need to roll it through a couple of times to get a clean cut. This is the result you will get :

With the spellbinders its quite easy to make frames from these dies.

take 2 diffrent sized dies and place together. I usually use a bit of tape to keep them straight.

again using the same plate combo as before run this through your cuttlebug machine this is what it will look like once it has cut.
this is the page i made using these 2 die cuts:

see so many possibilities with these dies and they are also good for other die cut machines too just go to the spellbinders website to see which machines are compatible.
Hope you all enjoy your week. Dont forget to check out all the new yummy goodies coming into the store....
take care
Sheree